Guacamole Frankenstein

I was invited to a neighborhood Halloween party for the kids and was assigned “guacamole.” The host said, “You’re doing the guacamole coming out of the pumpkin.” Well, that’s been done for the last few years so I immediately hopped online and googled “Halloween Guacamole.”

A lot of pics came up and most were the usual pumpkin-vomiting guacamole. Then I came across the Guacamole Frankenstein and I was sold! Here is what I ended up with:

IMG_5190

As soon as I finished, I felt that he looks more like a hockey player than Frankenstein so go ahead and blame my upbringing for that one!

Instead of making the guacamole myself, I opted for store-bought for one single reason: I knew I could leave it out for several hours and it wouldn’t brown. It was a party and I didn’t want to have to babysit it. I used green olives with pimento centers and eggplant skins for his hair, eyebrows and stitches.

I mounded the guacamole on the platter and smoothed it into the shape I wanted with a spatula. I used a knife to make his mouth and then I took a large spoonful of guacamole and slid it out to make his nose, then smoothed it into place.

I wasn’t sure how the kids would feel eating his head but they dove right in and didn’t have any problems! Happy Halloween!

SHOP MY KITCHEN!

IG logo

Did you make this recipe?
Tag @slicedicedish on Instagram and hashtag it #slicedicedish


Some of the links in this post may be affiliate links. Colleen Finley is an independent advanced director for Pampered Chef. She earns a commission by linking to products she uses and trusts. If you purchase a product through her website link, your cost will be the same, and Colleen will automatically receive a small commission. Your support is greatly appreciated and helps us enrich lives, one meal and one memory at a time!

Halloween Cookie Cutters

HCC1

Whether you’re having a party, making a gift, or just having fun in the kitchen, the Halloween Cookie Cutters are the cutest way ever to get little ghouls and boys cooking (see what we did there?)

HCC2

These seven darling cutters were tested and approved by kids and include a vampire, skull, mummy, owl, monster, scarecrow (which I totally thought was a witch!), and ghost.  They measure 3½” diameter and make 3″ cookies.

HCC3

The cutters snap together for easy storage and they are dishwasher-safe.

Whenever I am using a recipe that calls for cookie cutters, I always default to this recipe for a lot of reasons.  First, it works EVERY. SINGLE. TIME. Second, the dough doesn’t need to be refrigerated so you are good to go as soon as you make it. Lastly, it holds the impressions of the cutters really, really well. And of course, it takes great!

Do you need these? Get them here: SHOP MY KITCHEN!

Want to see me making them?  Check out this video!

IG logo

Do you have these? Show me what you’re making!
Tag @slicedicedish on Instagram and hashtag it #slicedicedish


Some of the links in this post may be affiliate links. Colleen Finley is an independent advanced director for Pampered Chef. She earns a commission by linking to products she uses and trusts. If you purchase a product through her website link, your cost will be the same, and Colleen will automatically receive a small commission. Your support is greatly appreciated and helps us enrich lives, one meal and one memory at a time!

Pumpkin Chipotle Chili

Once I really started cooking, I stopped buying a lot of convenience foods because I wanted to be authentic and make everything myself. Yes, overachiever… table for one. But then I remind myself that most people are just trying to get something on the table each night.

IMG_5600Last week when I was in Aldi, I came across some sauces that I found interesting and this was one of them! When I brought it home and showed it to Bill, his reaction was that of a nine-year-old as he turned up his nose and loudly said, “Ewwwwww!” It might have been in that moment that I knew I had a winner! (Both with the sauce and my soul mate).

I wasn’t sure what I was going to use it for until yesterday while I was eating my lunch and reading some food blogs that I came across a recipe for Pumpkin Chili. That’s when I knew what I’d use it for and I was excited to get home and give it a try!

Of course when I got home, my ground turkey was a solid mass of frozeness. So I hopped back online and researched how to thaw and cook the ground beef in my new Quick Cooker! (BTW, I’m really loving this thing and I never saw myself embracing it the way I have!)

After adding the trivet and some beef stock instead of water, I put in the frozen hunk of ground turkey on top of the trivet, set it to Chicken/Poultry and adjusted the time to 20 minutes. Off it went and when it was done, the ground turkey was perfectly cooked! I chopped it up with my Mix ‘N Chop, then drained it.

IMG_5602I set the Quick Cooker to saute and added the chopped onion and got it started and cooked it a minute or two until it started to soften.  Then I mixed back in the ground turkey. This will be the way I do my frozen ground meats from here on out. I used to thaw them in the microwave and that always ended up not great. It was overcooked in some spots and completely raw in others. Yuck! This was cooked perfectly and evenly throughout.

IMG_5603
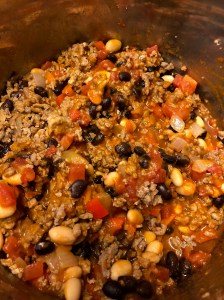
Next went in the red pepper (I’ll use green next time for more color contrast), beans, tomatoes (undrained) and the sauce. I gave it a quick stir and then set it to cook on the Stew/Chili setting for 8 minutes. I let it release on its own and then it automatically kicks into the Keep Warm setting (I LOVE LOVE LOVE that feature!) And it was absolutely perfect when Bill got home!

He loved it! (As I knew he would!) After he had eaten about half of it, I asked him if he liked the flavor. Then I asked him what he thought it tasted like? He wasn’t sure so I confessed and told him what I had used and he was genuinely impressed!

IMG_5613And then he ask that I make it again!  Guess I better run back to the store and get a few more bottles before it’s gone for the season!

I hope you try this recipe and let me know how you like it! And what was great is that most of these things (aside from the sauce) are usually what’s on hand so it’s easy for a weeknight and even easier in the pressure cooker!


Screen Shot 2018-10-24 at 1.42.58 PMPumpkin Chipotle Chili
Serves 12

2 pounds ground turkey
1 cup white onion, chopped
1 24oz jar Pumpkin Chipotle Pasta Sauce
1 cup red pepper, chopped
1 15oz can black beans, drained
1 15oz can cannellini beans, drained
1 14 oz can petite diced tomatoes, undrained
toppings of your choice

  1. Turn your instant pot to the Sear/Saute setting. Add in the ground turkey and break it up with the Mix ‘N Chop. Brown it for a couple minutes and then add in the onion and saute until the onions are translucent, about 5 minutes. (If you’re using ground beef you may have to drain off grease). Press Cancel.
  2. Add in the sauce, red pepper, black beans, cannellini beans, and tomatoes and stir to combine.
  3. Cover and secure the lid. Make sure valve is set to “sealing.” Set pressure cooker to Stew/Chili and adjust the time to 8 minutes.  Press Start.
  4. When the timer beeps let the pressure release naturally for 10 minutes (or more, if you have time). When you are ready to eat, manually release any remaining steam and remove the Lid.
  5. Stir the chili and then season to taste.
  6. Ladle into bowls and serve topped with desired toppings. This chili tastes better as leftovers than it does the day of! Store leftovers in an airtight container in the fridge for up to a week. This chili would also freeze well. Freeze in airtight containers for up to 3 months.

Enjoy!

IG logo

Did you make this recipe?
Tag @slicedicedish on Instagram and hashtag it #slicedicedish


Some of the links in this post may be affiliate links. Colleen Finley is an independent advanced director for Pampered Chef. She earns a commission by linking to products she uses and trusts. If you purchase a product through her website link, your cost will be the same, and Colleen will automatically receive a small commission. Your support is greatly appreciated and helps us enrich lives, one meal and one memory at a time!

Pressure Cooking

QC1

So I’m late to the pressure cooking party.  I know… and here’s why: being a Pampered Chef consultant, it’s sometimes hard for me to purchase kitchen products when I know we are probably going to come out with it at some point.

And to stay on the honesty train, I thought we would have debuted it last fall. But with the way hindsight works, I’m thankful it came out right when it did. It gave Pampered Chef time to work out the bugs and make it the best on the market to include ALL of the features everyone wants.

QC2

This state-of-the-art pressure cooker takes the guesswork out of cooking with 16 preprogrammed settings for everything from meat, rice, and beans to desserts. It’s perfect for tender, succulent meals in a fraction of the time it takes to slow cook. It was designed with your safety in mind: The steam-release valve is positioned away from the button so your hands are away from hot steam, and it was designed to stay cool even when food is cooking. The carrying handles let you securely move or store the Quick Cooker when it’s not in use. It’s a 6-quart capacity makes it the most popular size for most homes.

16 preprogrammed settings:

  • Sear
  • Steam
  • Slow cook
  • Proof (also used as the yogurt setting)
  • White rice
  • Brown rice
  • Whole grains
  • Chicken/poultry
  • Beef/pork
  • Fish/seafood
  • Soup/stock
  • Beans
  • Stew/chili
  • Dessert
  • Custom
  • Keep warm

I started with the #1 step: the water test. After that went successfully, I moved on to the #2 step: hard-boiled eggs. (Tip: I’ve been adding a splash of white vinegar to the water to make the shells come off even easier!) I’m LOVE LOVE LOVING the hard-boiled egg feature.  Especially when I don’t plan ahead and realize I need one for a recipe!

What else have I made? I made the Chicken Parmesan Pasta, Chicken Teriyaki & Rice, Salsa Chicken Lettuce Wraps, Beef Stew with Parmesan Polenta, Cheesecake (3 times, three different ways!) and the Sous Vide Egg Bites. By far, though, is my new favorite recipe: Sausage & Peppers. (Be on the lookout later this week for the recipe!)

I’ve also made this amazing Eggplant Parmesan Casserole from this cookbook!

QC3

What to see the Quick Cooker in action? Check out this quick video!

SHOP MY KITCHEN!

IG logo

Do you have the Quick Cooker? Show me what you’re making in it!
Tag @slicedicedish on Instagram and hashtag it #slicedicedish


Some of the links in this post may be affiliate links. Colleen Finley is an independent advanced director for Pampered Chef. She earns a commission by linking to products she uses and trusts. If you purchase a product through her website link, your cost will be the same, and Colleen will automatically receive a small commission. Your support is greatly appreciated and helps us enrich lives, one meal and one memory at a time!

Baked Granola Bars with Orange Zest & Pepitas

IMG_5238

Since I fell in love with the Snack Bar Maker, making granola bars has becoming my Sunday afternoon baking ritual. And what I love about this master recipe is that you can change up the mix-ins in so many different ways! It’s like a new recipe each week!

There is a little bakery across the street from my office that has these great bars that they make and sell for $7.50 each (YIKES!). I’ve been trying to recreate them and I think this week I nailed it! And for much less $$$!

Screen Shot 2018-10-14 at 5.41.28 PM
Baked Granola Bars with Orange Zest & Pepitas

Makes 16

1 1/2 cups old-fashioned oats
1/2 teaspoon baking soda
1/2 cup semi-sweet mini chocolate morsels
1/2 cup salted pepitas
2 teaspoons orange zest
1/4 cup agave nectar
3 tablespoons brown sugar
2 tablespoons melted butter
1 tablespoon sea salt

  1. Heat the oven to 350˚F.
  2. Zest an orange to measure 2 teaspoons.  In a medium bow, combine the oats, baking soda, mini chocolate morsels, peptias and orange zest.  Add in the agave nectar, melted butter and brown sugar, stirring well to combine.
  3. Using a medium scoop, transfer the mixture into the wells of the Snack Bar Maker and press down with the Mini Nylon Serving Spatula.
  4. Bake 12 minutes or until the oats start to brown.
  5. Remove from the oven to a cooling rack and cool for 5 minutes.  Cover with the lid and chill in the refrigerator for 15 minutes until set.

Enjoy!

SHOP MY KITCHEN

See me make this recipe here:

IG logo
Did you make this recipe?
Tag @slicedicedish on Instagram and hashtag it #slicedicedish


Some of the links in this post may be affiliate links. Colleen Finley is an independent advanced director for Pampered Chef. She earns a commission by linking to products she uses and trusts. If you purchase a product through her website link, your cost will be the same, and Colleen will automatically receive a small commission. Your support is greatly appreciated and helps us enrich lives, one meal and one memory at a time!