Why You Need a Veggie Spiralizer

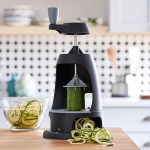
I knew the moment Pampered Chef debuted their version of the Veggie Spiralizer I would be in love. I already had one that I owned for a few years but what drew me to Pampered Chef’s is the fact that it’s vertically loaded vs. horizontally loaded. The one I had previously would wobble due the the weight of the vegetables. With Pampered Chef’s, there is no wobble and it’s very easy to use (and clean!)

The Veggie Spiralizer quickly makes fun, flavorful veggie and fruit “noodles” you can turn into healthy, satisfying meals. The handle makes it easier to spiralize food, a chute that keeps “noodles” from breaking, and the comb handle makes it easy to change blades. Make cucumber ribbons for a salad, sweet potato spaghetti, butternut squash fettuccine… there are endless options!

Plus, there are a bunch of recipes ready to go with your new kitchen toy! You can check out the ebook HERE.

When I began making the switch to spiralized vegetables, I didn’t go 100% vegetable all at once because I thought that would be too much of an immediate transition. So what I did was use equal parts yellow squash and pasta, usually spaghetti or thin spaghetti. That way the meals would have the same texture as pasta but add the boost of more vegetables.

Also, when I use zucchini or yellow squash, I don’t cook them very long. If the sauce I am using is hot, I will let the sauce do the work of cooking the vegetable noodles. If the sauce is cold, I will sauté the vegetable noodles for just about 2 minutes so they don’t get too soft. All other veggie will I cook according to the recipe directions.

Some of my favorite recipe resources for spiralized vegetables, in addition to my recipes of course, are Pampered Chef and Inspiralized.

If you’re ready to add the Veggie Spiralizer to your kitchen, you can grab it HERE!

SHOP THE REST OF MY KITCHEN!

If you make this recipe, please be sure to leave a comment and/or give this recipe a rating! Above all, I love to hear from you and always do my best to respond to each and every comment. And of course, if you do make this recipe, don’t forget to tag me on Instagram! Looking through the photos of recipes you all have made absolutely makes my day!


Some of the links in this post may be affiliate links. Colleen Finley is an independent advanced director for Pampered Chef. She earns a commission by linking to products she uses and trusts. If you purchase a product through her website link, your cost will be the same, and Colleen will automatically receive a small commission. Your support is greatly appreciated and helps us enrich lives, one meal and one memory at a time!

Everything on this site, recipes and photos belong to the author and any reprints are only by permission of the author.

Squash & Green Beans with Romesco Sauce (GF/DF)

A few summers ago, when Bill and I vacationed in Martha’s Vineyard, we had some of the best meals we’ve ever eaten. Our first night we ate at The Covington, which was a recommendation of a local gentleman we met at lunch. On the specials menu they had an appetizer of squash and beans with a creamy romesco sauce. Bill thought it sounded weird but we ordered it anyway and we cleaned the plate! I was in heaven. I’ve been wanting to recreate it ever since and I think I’ve come pretty close!

This recipe can stand alone as an appetizer or be used as a side dish. It’s great for summer because you can use the vegetables are are becoming abundant in home gardens and farmers markets.

Bell peppers are great for gut health because of their fiber and folate, plus they are a great source of potassium and vitamin A. A cup of zucchini will also fulfill 26% of your daily vitamin C needs, 10% of your daily potassium needs and 8% of your daily magnesium needs and 13% of your daily folate needs, per the FDA. Green beans are a good source of protein and fiber, which helps lower cholesterol and they help fight inflammation.

Squash & Green Beans with Romesco Sauce

Course: Appetizer
Cuisine: American
Keyword: appetizer, Dairy Free, Gluten Free, vegetables
Servings: 4
Calories: 291kcal
Use up some of your summer veggies from your garden or grab them from the store… either way this appetizer or side dish is certain to be the star of the show!
Print Recipe

Ingredients

  • Romesco Sauce:
  • ½ cup almonds
  • 1 12oz jar roasted red bell peppers, drained
  • ¼ cup tomato paste
  • 1 tablespoon apple cider vinegar
  • 3 garlic cloves, pressed
  • 1 teaspoon smoked paprika
  • 1 teaspoon garlic powder
  • ½ teaspoon thyme
  • ¼ teaspoon cayenne pepper
  • ½ teaspoon ground black pepper
  • ½ teaspoon salt
  • ¼ cup olive oil
  • 3 tablespoons olive oil, divided
  • 2 shallots, thinly sliced
  • 8 ounces green beans, washed and trimmed
  • 2 small zucchini, cut in thirds, then into wedges
  • 2 small yellow squash, cut in thirds, then into wedges
  • 2 tablespoons chives, chopped

Instructions

  • In a small skillet over medium heat, toast the almonds for 5 minutes. Remove from the heat and cool. Place the almonds in the bowl of a food processor fitted with the multi-use blade and pulse until coarsely chopped. Add the peppers, tomato paste, apple cider vinegar, garlic, paprika, garlic powder, thyme, cayenne, black pepper and salt and blend until smooth. Remove the sauce to a bowl and stir in the olive oil. Set aside.
  • In a clean small skillet, heat 1 tablespoon oil over medium-high heat until shimmering. Add one shallot and fry until golden brown, about 15 minutes. When golden, remove from the oil and drain on paper towels.
  • Meanwhile, prepare a bowl of ice water and set aside. In a large saucepan, bring 3 cups of water to a boil. Add the green beans and and cook until crisp-tender, 3-5 minutes. Drain and immediately plunge into the ice water.
  • Heat 2 tablespoons oil over medium-high heat in a large skillet until the oil shimmers, about 3 minutes. Add the zucchini and squash and sauté 5 minutes. Season with salt and pepper.
  • To serve, place half of the romesco sauce on a serving plate. Top with the green beans, squash and shallot. Sprinkle with the fried shallot and chives. Dollop remaining romesco sauce around the edge of the plate.

Notes

SHOP THIS RECIPE BY CLICKING AN IMAGE BELOW:
8.5  Flex+ Multi-Prep Set  4-qt. (3.8-L) Brilliance Nonstick Sauce Pan Entertaining Platter Set
SHOP THE REST OF MY KITCHEN!
If you make this recipe, please be sure to leave a comment and/or give this recipe a rating! Above all, I love to hear from you and always do my best to respond to each and every comment. And of course, if you do make this recipe, don’t forget to tag me on Instagram! Looking through the photos of recipes you all have made absolutely makes my day!
Screen Shot 2019-03-10 at 4.49.00 PM

FOLLOW ME HERE FOR MORE IDEAS:
    

Some of the links in this post may be affiliate links. Colleen Finley is an independent advanced director for Pampered Chef. She earns a commission by linking to products she uses and trusts. If you purchase a product through her website link, your cost will be the same, and Colleen will automatically receive a small commission. Your support is greatly appreciated and helps us enrich lives, one meal and one memory at a time!
Everything on this site, recipes and photos belong to the author and any reprints are only by permission of the author.

Nutrition

Serving: 1g | Calories: 291kcal | Carbohydrates: 20g | Protein: 7g | Fat: 23.3g | Saturated Fat: 2.9g | Sodium: 327mg | Potassium: 860mg | Fiber: 6.3g | Sugar: 7.4g | Calcium: 95mg | Iron: 3mg

Smoothie Recipe Round-Up

As the weather gets warmer I don’t crave heavy meals as much as I do when it’s cold. Maybe that’s because I’m bundled up and not thinking about swimsuit season!

All of the smoothies I have on my blog are great to add in to your diet any time of year. The sweet potato in most of the recipes helps keep you satisfied, plus they are high in fiber and antioxidants, which protect your body from free radical damage and promote a healthy gut and brain. They’re also incredibly rich in beta carotene, which is converted to vitamin A to support good vision and your immune system.

On Sundays I roast 3-4 sweet potatoes while I’m doing others things so they are ready to go throughout the week.

In each smoothie I add a scoop of Pampered Chef’s Pea Protein and Super Veggie. All of Pampered Chef’s Enrichables are soy free, vegan, gluten-free, non-GMO, dairy-free and made without nuts. One scoop per recipes as a nutritional boost with no effort! If you’re wondering if Enrichables might be a good fit for you, try taking this QUIZ and see!

The Enrichables add a boost to your smoothies and can be substituted with an alternate protein powder if you want or omitted all together. The smoothies are packed with nutrients as they are so you’ll be fine.

Here are all of my smoothie recipes so you can click on any of the ones you want and give them a try!

Chocolate Covered Banana Smoothie
Check out this recipe
Pineapple Sweet Potato Smoothie
Check out this recipe
PB&J Sweet Potato Smoothie
Check out this recipe
Berry Orange Spinach Sweet Potato Smoothie
Check out this recipe
Spinach Banana Sweet Potato Smoothie
Check out this recipe
Blueberry Sweet Potato Smoothie
Check out this recipe
Brownie Batter Smoothie
Check out this recipe

SHOP MY KITCHEN!

If you make these recipes, please be sure to leave a comment and/or give this recipe a rating! Above all, I love to hear from you and always do my best to respond to each and every comment. And of course, if you do make this recipe, don’t forget to tag me on Instagram! Looking through the photos of recipes you all have made absolutely makes my day!

Screen Shot 2019-03-10 at 4.49.00 PM


Some of the links in this post may be affiliate links. Colleen Finley is an independent advanced director for Pampered Chef. She earns a commission by linking to products she uses and trusts. If you purchase a product through her website link, your cost will be the same, and Colleen will automatically receive a small commission. Your support is greatly appreciated and helps us enrich lives, one meal and one memory at a time!Everything on this site, recipes and photos belong to the author and any reprints are only by permission of the author.

Summer Mojo Veggie Toss (GF/DF)

Grab the zucchini and yellow squash from your garden bounty for this one! This is delicious on its own or with grilled shrimp or chicken on top!

Did you know that zucchini botanically is classified as a fruit? I didn’t either! Zucchini, also known as courgette, is a summer squash in the Cucurbitaceae plant family, alongside melons, spaghetti squash, and cucumbers. It is rich in antioxidants and contains small amounts of iron, calcium, zinc, and several vitamins.

Yellow squash is high in vitamins A, B6, and C, folate, magnesium, fiber, riboflavin, phosphorus, manganese and potassium. A cup of sliced yellow squash offers 9% of your daily iron requirement and 14% of your daily folate requirement.

Serrano peppers are a spicy pepper used in a variety of different cuisines. It contains a variety of vitamins and minerals, including vitamin C, potassium, copper, and manganese, and is low in calories and fat.

Mojo in recipes refers to A marinade used throughout the Caribbean and South America that uses citrus juices as a base.

Another pretty dish full of nutrients that you can feel good about!

Enjoy!

SMP

Summer Mojo Veggie Toss (GF/DF)

Course: Side Dish
Cuisine: American
Keyword: Dairy Free, Gluten Free, summer, vegetables
Servings: 4
Calories: 308kcal
Spanish for “sauce,” this traditional mojo has citrus for tang that marries these summer vegetables perfectly
Print Recipe

Ingredients

  • 6 limes
  • ½ small red onion
  • 2 serrano peppers, stemmed and seeded
  • 1 bunch fresh cilantro
  • ½ cup plus 1 tablespoon olive oil, divided
  • 3 garlic cloves, peeled
  • 1 teaspoon salt
  • 1 teaspoon sugar
  • 3 medium zucchini
  • 1 medium yellow squash
  • 1 carrot, peeled and cut into matchsticks
  • 1 pound asparagus, cut into 1-inch pieces

Instructions

  • For the sauce, juice the limes to measure 1 cup juice.  Slice the onion into quarters.  Place the juice, onion, serranos, cilantro, ½ cup oil, garlic, salt and sugar into a blender container.  Cover and blend until smooth.
  • Spiralize the zucchini and yellow squash and set aside.
  • Heat the remaining oil in a large skillet over medium-high heat 1-3 minutes or until shimmering.  Add the carrots and asparagus roast 8-10 minutes until the they begin to soften and caramelize.  Remove from the skillet and keep warm.  Add the zucchini and squash and toss until al dente, about 2 minutes, then transfer to a large serving bowl.
  • Add the sauce to the zoodles and toss until evenly coated.  Top with the carrots and apsaragus and serve immediately.

Notes

HOP THIS RECIPE BY CLICKING AN IMAGE BELOW:
Citrus Press  Deluxe Cooking Blender  Veggie Spiralizer  Rapid-Prep Mandoline
SHOP THE REST OF MY KITCHEN!
 
If you make this recipe, please be sure to leave a comment and/or give this recipe a rating! Above all, I love to hear from you and always do my best to respond to each and every comment. And of course, if you do make this recipe, don’t forget to tag me on Instagram! Looking through the photos of recipes you all have made absolutely makes my day!
 
Screen Shot 2019-03-10 at 4.49.00 PM

FOLLOW ME HERE FOR MORE IDEAS:


Some of the links in this post may be affiliate links. Colleen Finley is an independent advanced director for Pampered Chef. She earns a commission by linking to products she uses and trusts. If you purchase a product through her website link, your cost will be the same, and Colleen will automatically receive a small commission. Your support is greatly appreciated and helps us enrich lives, one meal and one memory at a time!
Everything on this site, recipes and photos belong to the author and any reprints are only by permission of the author.

Nutrition

Serving: 4g | Calories: 308kcal | Carbohydrates: 23.3g | Protein: 5.1g | Fat: 25.8g | Saturated Fat: 3.7g | Sodium: 612mg | Potassium: 674mg | Fiber: 7.3g | Sugar: 8.1g | Calcium: 92mg | Iron: 4mg


Vintage Boston Chocolate Fudge Cake (GF)

I’ve recently become OBSESSED with a vintage cookbook! About 25 years ago, I found the Modern Guide to Better Meals by Jessie Marie DeBoth at an antique store near where my aunt lived in Skaneateles, NY. Over the years I’ve looked through but last week, I picked it up and have been reading it page-by-page and I’m fascinated!

I’m completely intrigued by the simplicity (or so I thought), the lack of seasoning (most recipes only use salt, pepper and on occasion, mace) and the reality that shortening was a major pantry staple. Also, breadcrumbs are not what we think of breadcrumbs in 2023.

This cookbook in particular is two FULL YEARS of daily menus. The forward says in part:

This Calendar of dinners has been prepared as a quick, handy, and accurate reference work for hostesses, home-makers and cook alike; a compendium of what to serve and how to prepare it on special occasions and on any day of the year.

I’m happy to read that these are “special occasion” menus because each is a FULL menu! Salad, protein, vegetable (at least one) and dessert. Cooking one of these full menus would take all day, even with modern conveniences. I couldn’t imagine any individual being able to make these meals day after day and surviving! Many recipe are soufflés (reminder that I need to order a soufflé dish) and ring molds (reminder that I need to order a ring mold too) and appear to take hours.

After getting deeper and deeper into the book, I went online to see what other books Jessie Marie had written. She has many available on Etsy and eBay. Then I found this article with information on Ms DeBoth’s life. I’m mesmerized! And then to read that she was a celebrity chef back when celebrity chef’s weren’t even a thing. Wow! What an inspiration!

I shared with my friends some of the recipes I was found most interesting, including Ginger Ale Salad, Hog Jowls with Poached Eggs, Baked Stuffed Heart, and Broken Stuffing Ring. One of my friends challenged me to make some of the recipes. I shared that with Bill and he agreed that we need to try some… but within reason!

Deciding to start with a dessert, mainly because I had all of the ingredients on hand short of shortening (pun intended), I got out the ingredients and went to work. Remember when you hear over and over to read ALL instructions before beginning to cook or bake? That definitely rings true with this cookbook!

Today’s cookbooks have exact measurements, and clear and linear instructions. That’s not the case with this book, although I’m sure it all made sense “back in the day.”

For example, here are the instructions for this cake recipe:

Blend shortening, salt, soda and vanilla; add sugar and cream thoroughly. Add yolks. Stir in sifted dry ingredients alternately with cream and water. Fold in stiff whites. Bake in greased 10-inch square pan in moderate oven, 350˚F, about 50 minutes. Frost as desired.

Realizing I needed to separate the eggs (not listed as separated in the ingredients list) and needing to beat them to stiff peaks, I opted to do that step first with my electric mixer. Another note: an egg beater is often referenced. I used one once and it was exhausting!

All in all, it took me about an hour to prep the cake batter. Since the instructions were not crystal clear, I found I had to think through the steps a little more than usual. In the end, though, I created a delicious, moist cake that we will definitely make again! Here is the recipe with updated instructions and the ingredients I ended up using.

I did make my own gluten-free cake flour by sifting 14 tablespoons all-purpose gluten free flour (1:1) with 2 tablespoon cornstarch per 1 cup of flour required.

Enjoy!

Vintage Boston Chocolate Fudge Cake (GF)

Course: Dessert
Cuisine: American
Keyword: cake, fudge, Gluten Free
Servings: 12
Calories: 297kcal
This single-layer moist cake will quickly become a favorite
Print Recipe

Ingredients

  • 2 eggs, separated
  • ¼ cup butter, softened
  • ¼ cup canola oil
  • ½ teaspoon salt
  • ¼ teaspoon baking soda
  • 1 teaspoon vanilla
  • 2 cups brown sugar
  • cups cake flour, sifted
  • 4 tablespoons cocoa powder
  • 2 teaspoons baking powder
  • ½ cup sour cream
  • ½ cup water

Instructions

  • Sift the cake flour, cocoa powder and baking powder into a bowl and set aside. Lightly grease an 8-inch square pan and set aside.
  • Using an electric mixer, beat the egg whites stiff using a whisk attachment, about 5 minutes.
  • In a clean mixer bowl, blend the butter, oil, salt, baking soda and vanilla. Add the sugar and cream thoroughly. Add the yolks and cream again.
  • While the mixer is running in the lowest setting, add ⅓ of the sifted ingredients. Add the sour cream and another ⅓ of the sifted ingredients. Add the water and remaining sifted ingredients.
  • Gently fold in the egg whites. Pour into the prepared pan and bake 45 minutes or until a cake tester inserted in the center comes out clean.
  • Remove from the oven and cool completely before frosting as desired.

Notes

SHOP THIS RECIPE BY CLICKING AN IMAGE BELOW:
Deluxe Stand Mixer | Pampered Chef US Site  Measuring Cup Set  Measuring Spoon Set  8
SHOP THE REST OF MY KITCHEN!
If you make this recipe, please be sure to leave a comment and/or give this recipe a rating! Above all, I love to hear from you and always do my best to respond to each and every comment. And of course, if you do make this recipe, don’t forget to tag me on Instagram! Looking through the photos of recipes you all have made absolutely makes my day!
Screen Shot 2019-03-10 at 4.49.00 PM

FOLLOW ME HERE FOR MORE IDEAS:
    

Some of the links in this post may be affiliate links. Colleen Finley is an independent advanced director for Pampered Chef. She earns a commission by linking to products she uses and trusts. If you purchase a product through her website link, your cost will be the same, and Colleen will automatically receive a small commission. Your support is greatly appreciated and helps us enrich lives, one meal and one memory at a time!
 
 
Everything on this site, recipes and photos belong to the author and any reprints are only by permission of the author.

Nutrition

Serving: 1g | Calories: 297kcal | Carbohydrates: 45.5g | Protein: 4.3g | Fat: 11.6g | Saturated Fat: 4.4g | Cholesterol: 42mg | Sodium: 176mg | Potassium: 214mg | Fiber: 1.3g | Sugar: 23.7g | Calcium: 78mg | Iron: 2mg

Lemon Shrimp & Scallop Risotto (GF)

One thing that makes me happy in the kitchen is when I can make a restaurant-quality meal at home for a fraction of the price we’d pay if we had gone out to eat. This one is so good and is elegant-enough for dinner with friends and comfy-cozy for a nice night at home.

I try to buy my shrimp already peeled and deveined so I can skip that step and making it in an electric pressure cooker makes prep and cleanup a breeze!

I can’t wait for you to try this!

Lemon Shrimp & Scallop Risotto

Course: Main Course
Cuisine: American
Keyword: Risotto, Scallops, Shrimp
Prep Time: 10 minutes
Cook Time: 30 minutes
Total Time: 40 minutes
Servings: 8
Calories: 252kcal
Elegant, warm and cozy all at the same time
Print Recipe

Ingredients

  • 1 red pepper
  • 1 lemon
  • 1 tbsp olive oil
  • 1⅓ cups Arborio Rice
  • ¼ cup white wine
  • cups vegetable stock
  • ¾ pound bay scallops, patted dry
  • 3 cups fresh spinach
  • ¾ pound peeled and deveined shrimp
  • parmesan cheese, for serving

Instructions

  • Chop the red pepper into small dice and set aside. Zest the lemon and set aside, then cut the lemon in half.
  • Using the saute function on an electric pressure cooker, heat the oil in the inner pot for 3 minutes or until hot. Stir in the rice and red pepper, season with salt, and cook until the rice is lightly toasted, about 4 minutes.
  • Add the wine and stir until it has evaporated. Then add the stock and ⅔ of the lemon zest and stir.
  • Lock the lid into place and cook on high pressure for 5 minutes. When the time is up, manually release the pressure.
  • Remove the lid and stir the risotto. Quickly add the shrimp and scallops and stir. Top wit the spinach and immediately replace the lid. Let stand for 10 minutes.
  • Remove the lid and stir the spinach into the risotto. Add 1 tablespoon lemon juice from the lemon half and stir again. Spoon into bowls and top with grated parmesan.

Notes

SHOP THIS RECIPE BY CLICKING AN IMAGE BELOW:
Deluxe Multi Cooker  Easy-Read Measuring Cup Set  Quick Slice  Flexible Cutting Mat Set
SHOP THE REST OF MY KITCHEN!
If you make this recipe, please be sure to leave a comment and/or give this recipe a rating! Above all, I love to hear from you and always do my best to respond to each and every comment. And of course, if you do make this recipe, don’t forget to tag me on Instagram! Looking through the photos of recipes you all have made absolutely makes my day!
Screen Shot 2019-03-10 at 4.49.00 PM

FOLLOW ME HERE FOR MORE IDEAS:
    

Some of the links in this post may be affiliate links. Colleen Finley is an independent advanced director for Pampered Chef. She earns a commission by linking to products she uses and trusts. If you purchase a product through her website link, your cost will be the same, and Colleen will automatically receive a small commission. Your support is greatly appreciated and helps us enrich lives, one meal and one memory at a time!
Everything on this site, recipes and photos belong to the author and any reprints are only by permission of the author.

Nutrition

Serving: 1g | Calories: 252kcal | Carbohydrates: 33.3g | Protein: 19.7g | Fat: 4g | Saturated Fat: 1.5g | Cholesterol: 104mg | Sodium: 522mg | Potassium: 344mg | Fiber: 1.6g | Sugar: 2g | Calcium: 67mg | Iron: 1mg